Guide
5 Min.
Read

How to add a passkey login to T3 Stack?

The "T3 Stack" is a web development stack created by Theo Browne. It emphasizes simplicity, modularity, and robust type safety for full-stack development. It's got everything you need to build a feature-rich application fast and consists of Next.js, TypeScript, TailwindCSS, tRPC, NextAuth, and Prisma/Drizzle ORM.

Passkeys are a cool new way to sign in without needing any passwords. They use Touch ID or Face ID on your device to authenticate, which makes it way more secure and easier to use than old-school passwords and even those two-factor authentication methods we're used to. Let's see how you can add a passkey login to your app with T3 Stack.

The best part? You don't have to replace NextAuth for a different auth solution, because Hanko offers a NextAuth provider, making the integration of passkeys into NextAuth smooth and straightforward. Let's jump right in and learn how to add a passkey login to your T3 Stack.

Initialize your project

pnpm create t3-app@latest

Here's the configuration we've picked for our project. We decided to skip tRPC, but no worries if you're planning to use tRPC, the process will be pretty similar.

PASSKEYS_API_KEY="your-passkey-api-secret"
NEXT_PUBLIC_PASSKEYS_TENANT_ID="your-tenant-id"

Install the NextAuth Passkey provider

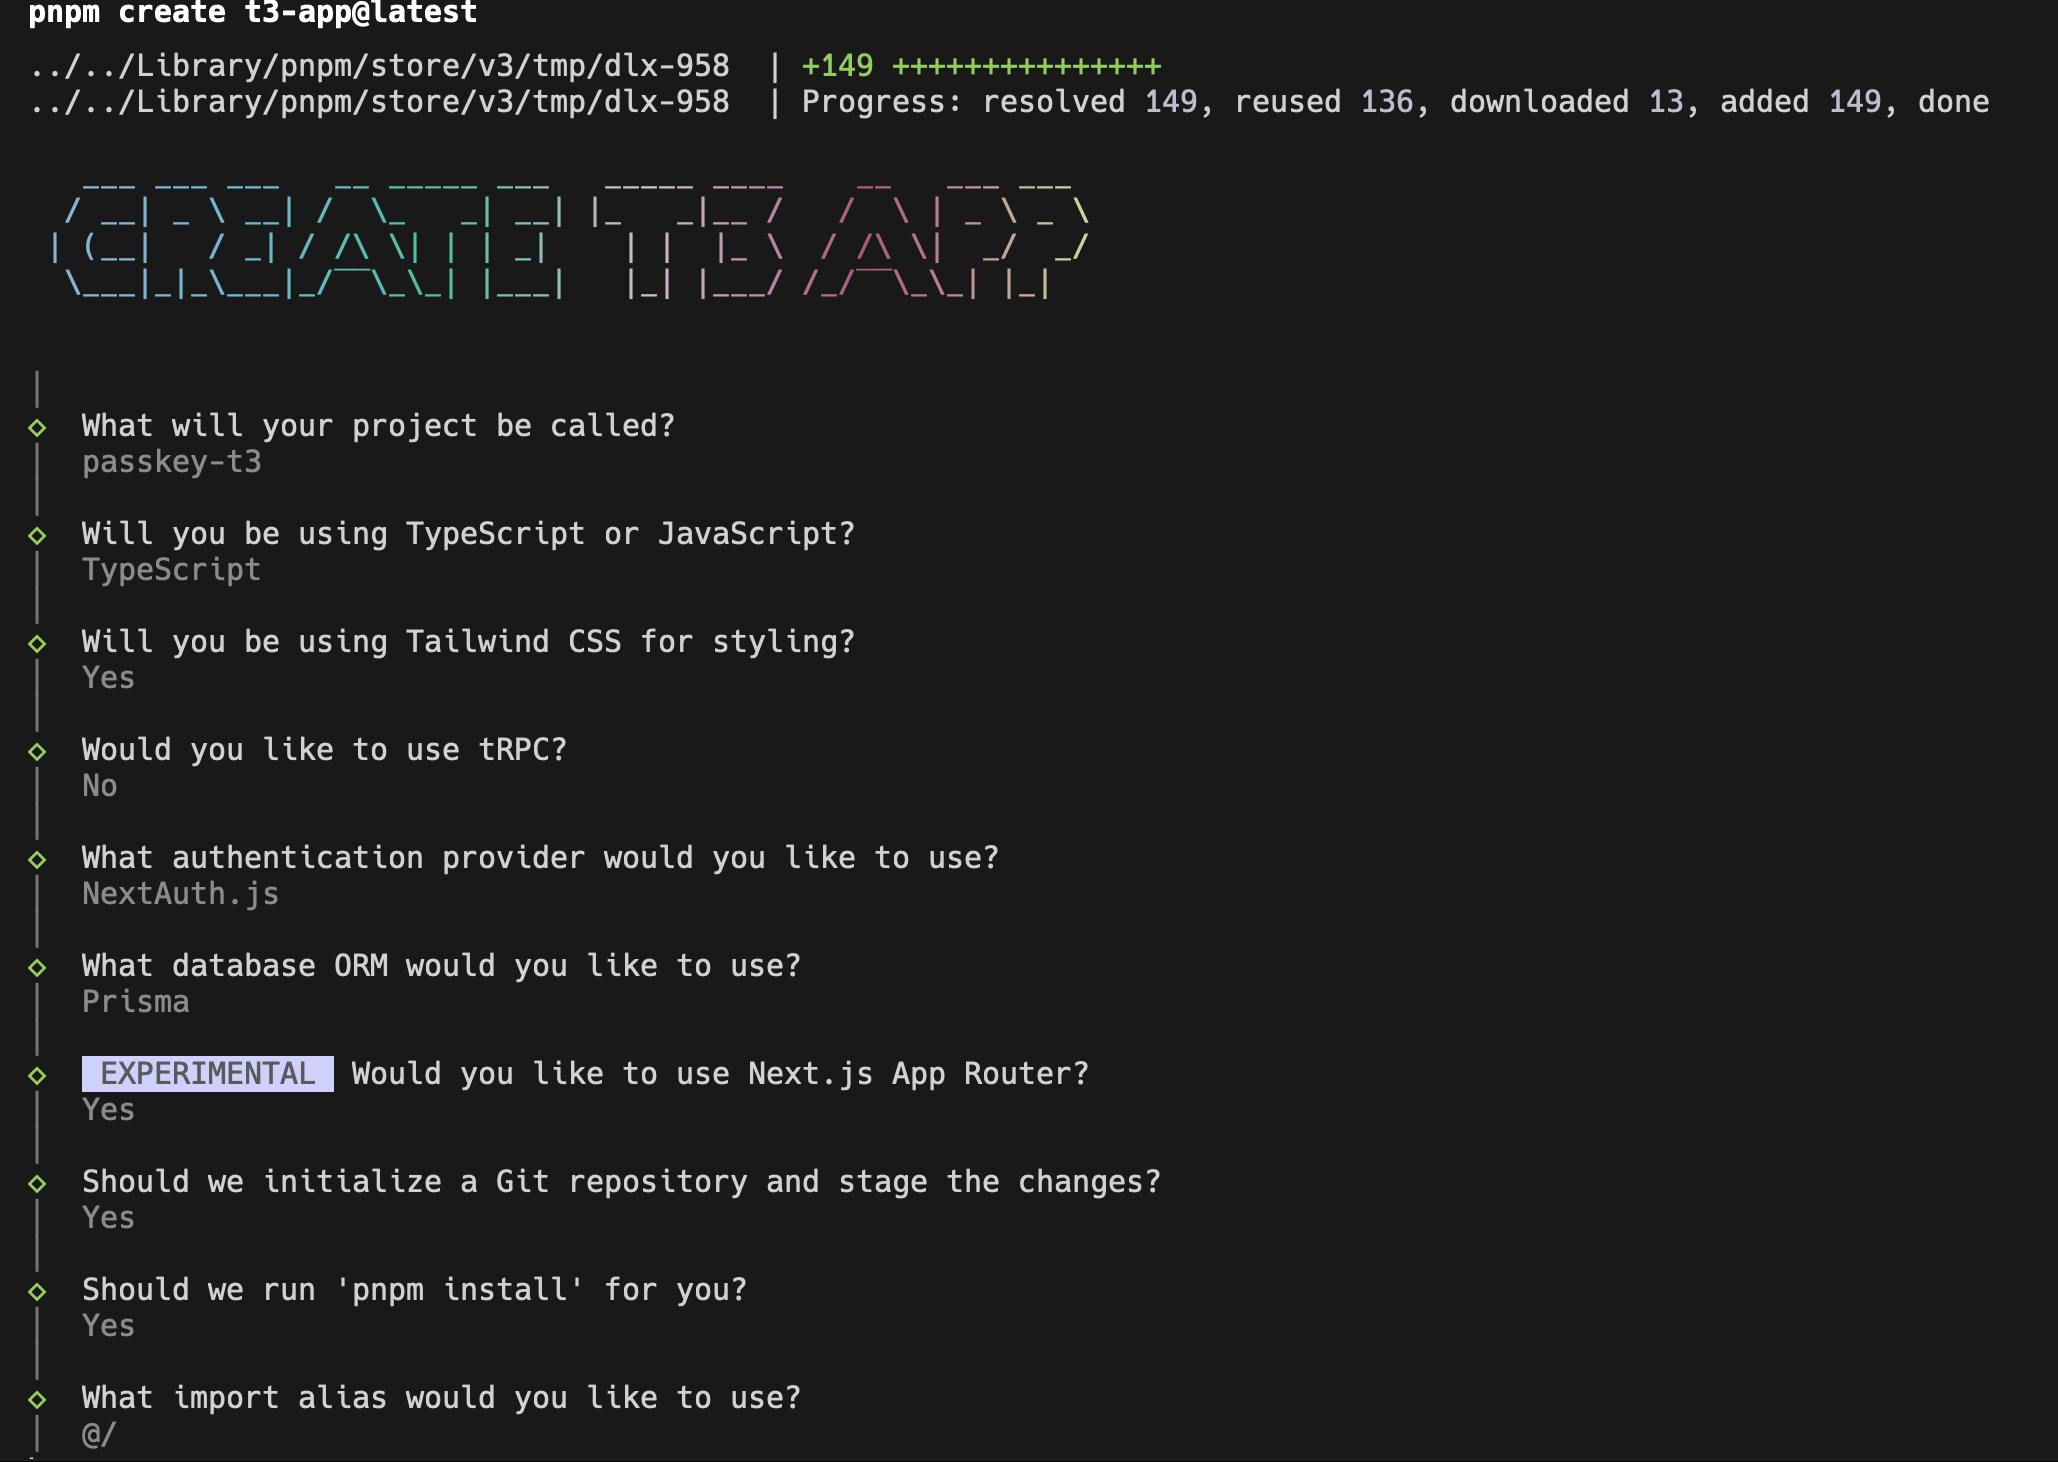
Install the passkey provider for NextAuth from Hanko and webauthn-json package by GitHub.

pnpm add @teamhanko/passkeys-next-auth-provider @github/webauthn-json

Add the Passkey provider to NextAuth

Open the auth.ts file and add this provider configuration.

PasskeyProvider({
      tenant: tenant({
        apiKey: env.PASSKEYS_API_KEY,
        tenantId: env.NEXT_PUBLIC_PASSKEYS_TENANT_ID,
      }),
      async authorize({ userId }) {
        const user = await db.user.findUnique({ where: { id: userId } });
        if (!user) return null;
        return user;
      },
    }),

You'll also need to use session: { strategy: "jwt" } and modify the session to get id from token.sub. This is how the complete code for auth.ts the file looks after adding Hanko passkey provider.

import { PrismaAdapter } from "@next-auth/prisma-adapter";
import {
  getServerSession,
  type DefaultSession,
  type NextAuthOptions,
} from "next-auth";
import GitHubProvider from "next-auth/providers/github";
import {
  tenant,
  PasskeyProvider,
} from "@teamhanko/passkeys-next-auth-provider";

import { env } from "@/env";
import { db } from "@/server/db";

declare module "next-auth" {
  interface Session extends DefaultSession {
    user: {
      id: string;
    } & DefaultSession["user"];
  }
}

export const authOptions: NextAuthOptions = {
  adapter: PrismaAdapter(db),
  providers: [
    GitHubProvider({
      clientId: env.GITHUB_CLIENT_ID,
      clientSecret: env.GITHUB_CLIENT_SECRET,
      allowDangerousEmailAccountLinking: true,
    }),
    PasskeyProvider({
      tenant: tenant({
        apiKey: env.PASSKEYS_API_KEY,
        tenantId: env.NEXT_PUBLIC_PASSKEYS_TENANT_ID,
      }),
      async authorize({ userId }) {
        const user = await db.user.findUnique({ where: { id: userId } });
        if (!user) return null;
        return user;
      },
    }),
  ],
  session: { strategy: "jwt" },
  callbacks: {
    session: ({ session, token }) => ({
      ...session,
      user: {
        ...session.user,
        id: token.sub,
      },
    }),
  },
};

export const getServerAuthSession = () => getServerSession(authOptions);

Allow your users to register passkey as a login method

Your users will have to add passkeys to their account somehow. It’s up to you how and where you let them do this, but typically this would be a button on an “Account Settings” page.

On your backend, you’ll have to call tenant({ ... }).registration.initialize() and .registration.finalize() to create and store a passkey for your user.

On your frontend, you’ll have to call create() from @github/webauthn-json with the object .registration.initialize() returned.

create() will return a PublicKeyCredential object, which you’ll have to pass to .registration.finalize().

Here we have created a new file named passkey.ts, inside of the server directory.

"use server";

import { tenant } from "@teamhanko/passkeys-next-auth-provider";
import { db } from "./db";
import { getServerAuthSession } from "./auth";
import { env } from "@/env";

const passkeyApi = tenant({
  apiKey: env.PASSKEYS_API_KEY,
  tenantId: env.NEXT_PUBLIC_PASSKEYS_TENANT_ID,
});

export async function startServerPasskeyRegistration() {
  const session = await getServerAuthSession();
  const sessionUser = session?.user;

  if (!sessionUser || !sessionUser.email) {
    throw new Error("Session user or email is not defined");
  }

  const user = await db.user.findUnique({
    where: { email: sessionUser.email },
    select: { id: true, name: true },
  });

  const createOptions = await passkeyApi.registration.initialize({
    userId: user!.id,
    username: user!.name ?? "",
  });

  return createOptions;
}

export async function finishServerPasskeyRegistration(credential: any) {
  const session = await getServerAuthSession();
  if (!session) throw new Error("Not logged in");

  await passkeyApi.registration.finalize(credential);
}

Alright, now let's get to creating a 'Passkey register' button. This is what kicks off the whole Passkey registration process for that user account.

"use client"

import { finishServerPasskeyRegistration, startServerPasskeyRegistration } from '@/server/passkey';
import { Button } from './ui/button';
import Passkey from './icons/passkey';
import {
    create,
    type CredentialCreationOptionsJSON,
} from "@github/webauthn-json";

const RegisterNewPasskey = () => {
    async function registerPasskey() {
        const createOptions = await startServerPasskeyRegistration();
        const credential = await create(createOptions as CredentialCreationOptionsJSON);

        await finishServerPasskeyRegistration(credential);
    }
    return (
        <Button
            onClick={() => registerPasskey()}
            className="flex justify-center items-center space-x-2"
        >
            <Passkey className="w-4 h-4 mr-2" />
            Register a new passkey
        </Button>
    )
}

export default RegisterNewPasskey

Get credentials from Hanko Cloud

Now, to make it work we're missing one crucial step: getting the Tenant ID and API key secret from Hanko Cloud. For that, navigate over to Hanko, create an account, and set up your organization. Navigate to 'Create new project', select 'Passkey Infrastructure', and provide your project name and URL.

Note: It's recommended to create separate projects for your development and production environments. This way, you can use your frontend localhost URL for the development project and your production URL for the live project, ensuring a smooth transition between environments without the need to modify the 'App URL' later.

Obtain your Tenant ID and create an API key, then add the Tenant ID and API key secret to your backend's '.env' file.

Now that you have your secrets added to your backend's .env file, you should be all set to register a passkey. Go ahead and give it a try!

Add a button to allow your users to log in with a passkey

Now that the passkey is successfully registered, let's add a 'Sign in with Passkey' button. This will allow users to easily login using their passkey.

"use client"

import { env } from "@/env";
import Passkey from "./icons/passkey";
import { Button } from "./ui/button"
import { signInWithPasskey } from "@teamhanko/passkeys-next-auth-provider/client";

const SignInWithPasskey = () => {
    return (
        <Button 
            onClick={() => signInWithPasskey({ 
                tenantId: process.env.NEXT_PUBLIC_PASSKEYS_TENANT_ID!, 
                callbackUrl: `${window.location.origin}/dashboard/settings` 
                })
            } 
            className="mt-4" variant="secondary"
        > 
            <Passkey className="w-4 h-4 mr-2" /> 
            Sign in with a passkey 
        </Button>
    )
}

export default SignInWithPasskey

And that's it! You now have a working Passkey login, making the authentication process much easier for your users 🚀 If you want to take a closer look or try it out for yourself, feel free to check out our GitHub repo.
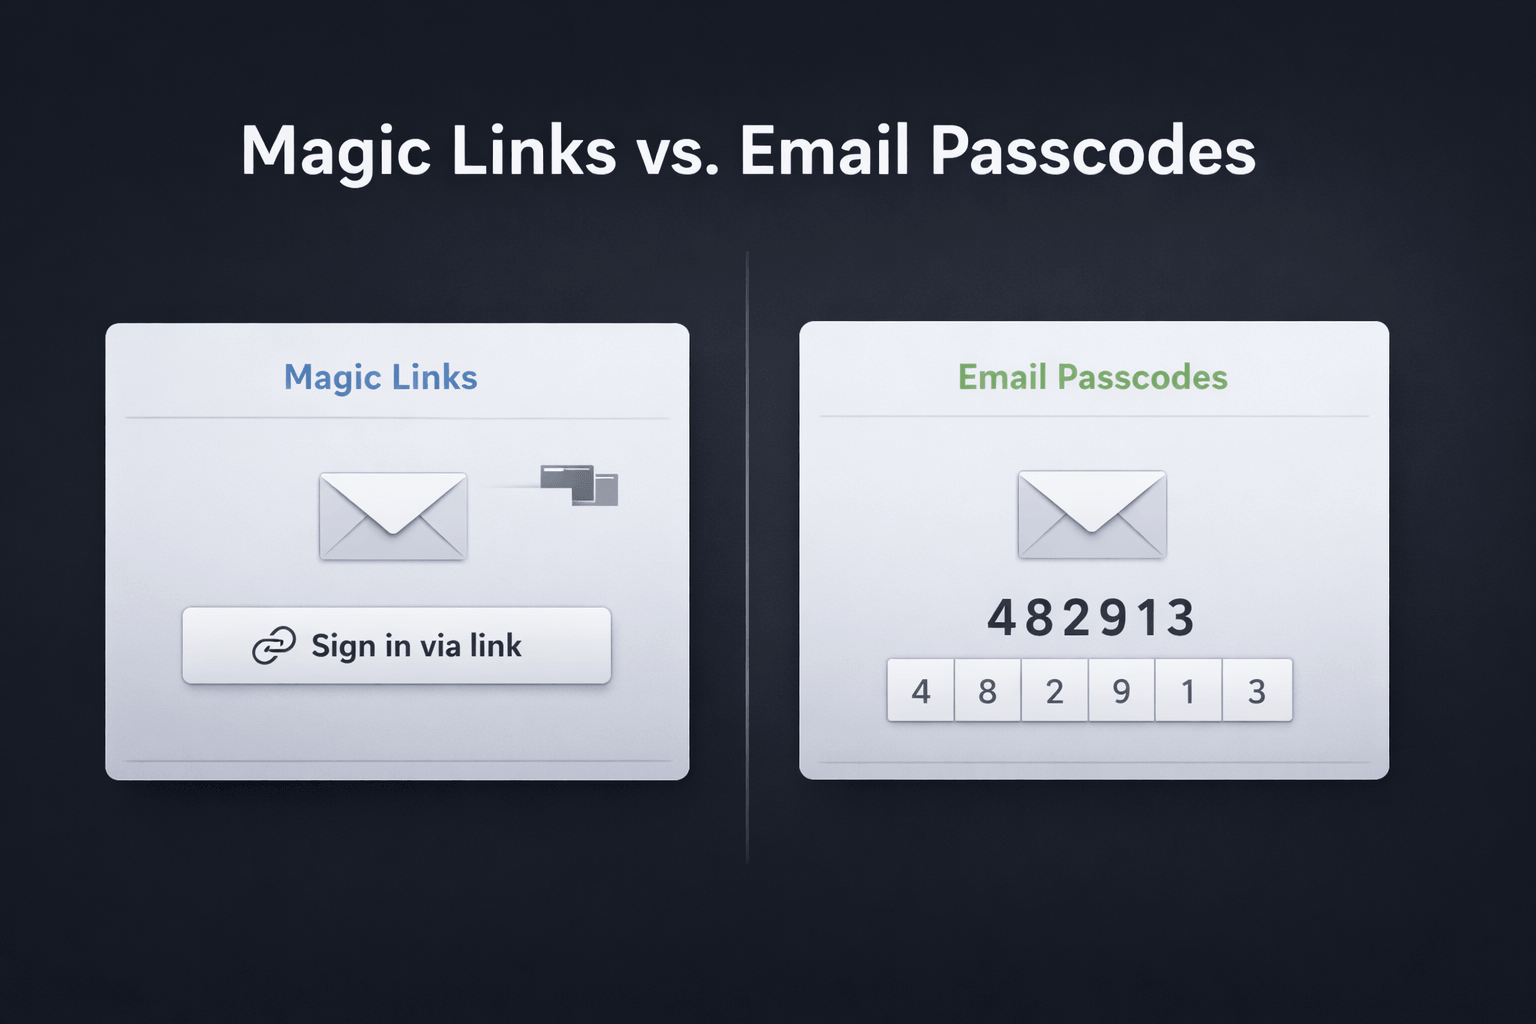
arrow
Back to overview

More blog posts

Don't miss out on latest blog posts, new releases and features of Hanko's products, and more.

Your submission has been received!
Something went wrong.